-
학원 day99. 빌더패턴, CSRF, 스프링 시큐리티 설정 및 이용기록 2023. 1. 25. 17:07

3Tier 스프링시큐리티 설정정보 관련 클래스인 CustomSecurityConfig는 WebSecurityConfigurerAdapter를 상속받음.
WebSecurityConfigurerAdapter는 2.7버전부터 비추천 클래스로 바뀜에 따라 2.6.7버전으로 만듦.
Configure메소드가 3개인데,
HttpSecurity객체를 매개변수로 받는 Configure메소드에는 다음과 같은 설정정보를 설정한다.
HTTP 요청에 대한 인증/인가 관련 설정정보를 정의한다.
1. HTTP 요청에 대한 인가 정책(권한체크 정책)을 설정한다.
2. 인증 정책(로그인 정책)을 설정한다.
3. 로그아웃 정책을 설정한다.
4. 예외처리 정책을 설정한다.
객체의 초기화
1. 생성자 메소드
public class Sample {
private final String url; // final이 붙어있으면 값을 직접 넣거나 생성자메소드를 통해서만 한번 바꿀 수 있다.
private final String username;
private final String password;
public Sample(String url, String username, String password) {
this.url = url;
this.username = username;
this.password = password;
}
}
// 객체의 생성과 초기화
Sample sample = new Sample("jdbc:oracle:thin:@localhost:1521:xe","hr","zxcv1234");
* 생성자 메소드를 이용하는 객체의 초기화
- 객체를 초기화하는 방법이 다양한 경우, 해당 경우의 수만큼 생성자 메소드를 중복정의해야 한다.
- 초기화하는 과정에서 전달되는 값은 서로 다르지만, 타입이 동일한 경우 생성자 메소드 중복정의로 해결할 수 없다.
2. Setter 메소드
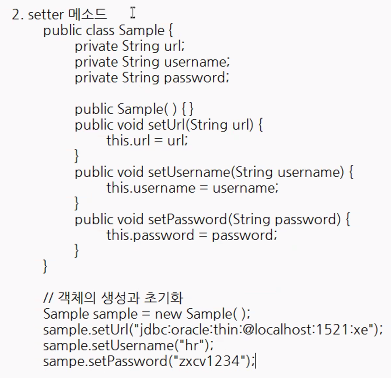
* Setter 메소드를 이용하는 객체의 초기화
- Setter 메소드가 public 메소드이기 때문에 객체의 생성직후 Setter 메소드로 초기화가 완료된 이후에도
Setter 메소드를 실행해서 객체의 값을 변경할 위험성이 존재한다. (setter메소드가 public이기 때문에)
3. 빌더 메소드
public class Sample {
private String url;
private String username;
private String password;
public static class SampleBuilder { // 정적클래스를 만든다. (외부에 만들어도 상관없음). User라는 객체를 생성하지 않고도 SampleBuilder를 사용하기 위해 static을 붙임.
private String url;
private String username;
private String password;
public SampleBuilder url(String url) {
this.url = url;
return this; // 자기자신 SampleBuilder가 반환된다.
}
public SampleBuilder username(String username) {
this.username = username;
return this; // 자기자신 SampleBuilder가 반환된다.
}
public SampleBuilder password(String password) {
this.password = password;
if(password == null || password.isEmpty()) {
this.password "zxcv1234";
}
return this; // 자기자신 SampleBuilder가 반환된다.
}
public Sample build() {
Sample sample = new Sample();
sample.url = this.url;
if (url == null) {
this.url = "jdbc:oracle:thin@localhost:1521:xe"
}
sample.username = this.username;
sample.password = this.password;
return sample;
}
}
}
// 객체의 생성과 초기화
SampleBuilder builder = new Sample.SampleBuilder();
Sample sample = builder.url("jdbc:oracle:thin:@localhost:1521:xe") // return this;로 인해 SampleBuilder 자기자신이 반환된다.
.username("hr") // return this;로 인해 SampleBuilder가 반환된다.
.password("zxcv1234") // return this;로 인해 SampleBuilder가 반환된다.
.build(); // sample이 반환된다.
 객체의 초기화(생성자, Setter, Builder).txt0.00MB
빌더패턴을 사용하면, 메소드체이닝을 통해 내가 원하는 조합으로 초기화시킬 수 있고, 초기화 된 이후에는 값을 변경할 수 없다.
public class User {

	private String id;
	private String password;
	private String name;
	private String email;
	private String tel;
	private int age;
	private Date birth;
	private String zipcode;
	private String address;
	private boolean enabled;

	private User() {}

	public String getId() {
		return id;
	}
	public String getPassword() {
		return password;
	}
	public String getName() {
		return name;
	}
	public String getEmail() {
		return email;
	}
	public String getTel() {
		return tel;
	}
	public int getAge() {
		return age;
	}
	public Date getBirth() {
		return birth;
	}
	public String getZipcode() {
		return zipcode;
	}
	public String getAddress() {
		return address;
	}
	public boolean isEnabled() {
		return enabled;
	}

	public static class Builder {    // User라는 객체를 쓰지 않고도 사용하기 위해 static으로 함.
		private String id;
		private String password;
		private String name;
		private String email;
		private String tel;
		private int age;
		private Date birth;
		private String zipcode;
		private String address;
		private boolean enabled;

		public Builder() {}

		public Builder id(String id) {
			this.id = id;
			return this;
		}
		public Builder password(String password) {
			this.password = password;
			return this;
		}
		public Builder name(String name) {
			this.name = name;
			return this;
		}
		public Builder email(String email) {
			this.email = email;
			return this;
		}

		public Builder tel(String tel) {
			this.tel = tel;
			return this;
		}
		public Builder age(int age) {
			this.age = age;
			return this;
		}
		public Builder birth(Date birth) {
			this.birth = birth;
			return this;
		}
		public Builder zipcode(String zipcode) {
			this.zipcode = zipcode;
			return this;
		}
		public Builder address(String address) {
			this.address = address;
			return this;
		}
		public Builder enabled(boolean enabled) {
			this.enabled = enabled;
			return this;
		}
		public User build() {
			User user = new User();
			user.id = this.id;
			user.password = this.password;
			user.name = this.name;
			user.email = this.email;
			user.tel = this.tel;
			user.age = this.age;
			user.birth = this.birth;
			user.zipcode = this.zipcode;
			user.address = this.address;
			user.enabled = this.enabled;

			return user;
		}
	}

}
public class App { public static void main(String[] args) { // User user = new User(); 이렇게 생성할 수 없다. 생성자 메소드가 private이라서! 생성자를 통해서 초기화되지 못하게 하려고 private인건가? Builder builder1 = new User.Builder(); User user1 = builder1.id("hong") // User에는 setter메소드가 없기 때문에 더이상 값을 못바꾼다. .password("zxcv1234") .name("홍길동") .build(); Builder builder2 = new User.Builder(); User user2 = builder2.id("kim") .name("김유신") .age(30) .build(); } }
CSRF(Cross-Site Request Forgery: 사이트 간 요청 위조)
- 사용자가 자신의 의지와는 무관하게 공격자가 의도한 행위를 특정 웹사이트에 요청하게 하는 공격을 말한다.
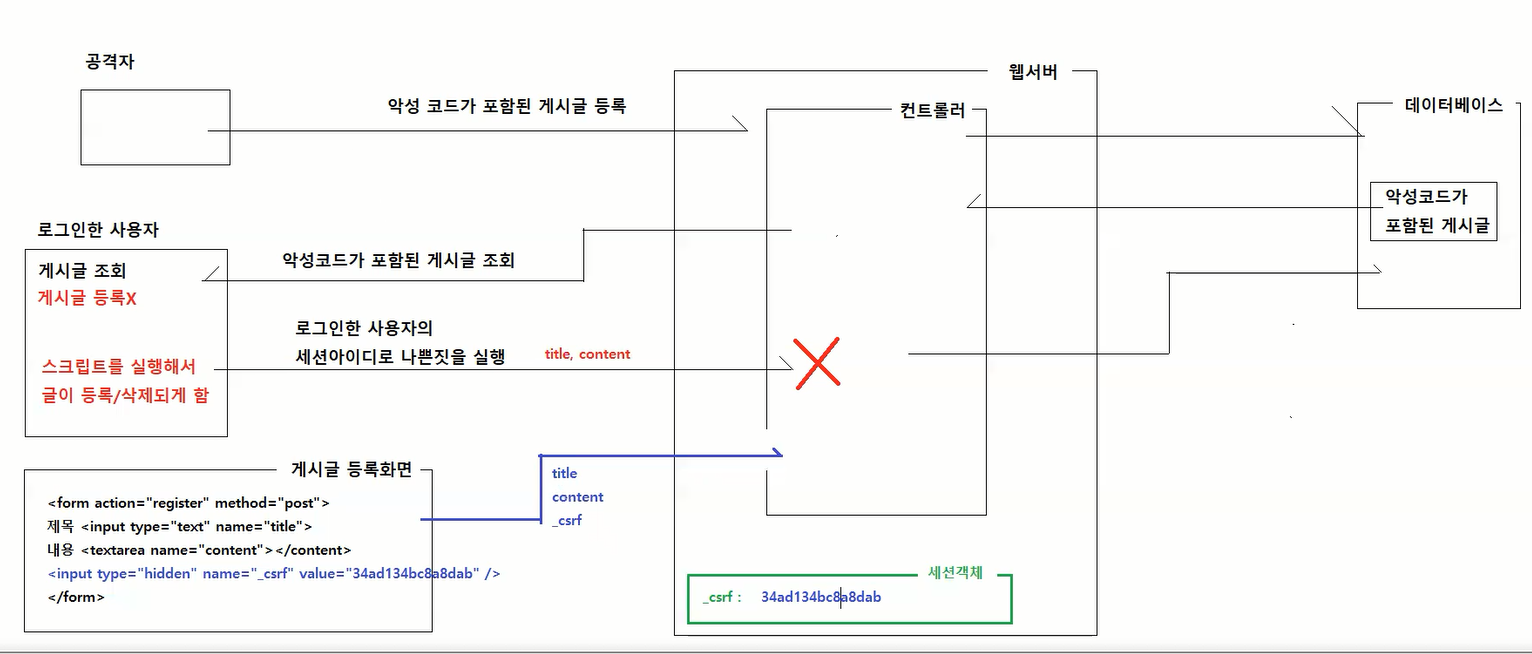
게시글을 조회하는 곳에서는 게시글을 등록할 수 없는데 공격자가 스크립트를 실행해서 글이 등록/삭제되게 만드는 것임.
이를 막기 위해 CSRF 토큰을 사용한다.
등록화면, 수정화면, 삭제화면에서는 폼태그 안에 hidden으로 CSRF토큰이 들어있다.
등록화면(post), 수정화면(put), 삭제화면(delete)에서만 CSRF토큰이 전해지고 조회화면에서는 CSRF토큰이 전달되지 않는다. (따라서, 사이트간 요청 위조를 할 수 없다.)
등록화면, 수정화면, 삭제화면의 경우, 스프링 시큐리티가 CSRF토큰이 있는지 확인하고 없으면 정상적인 요청이 아니라고 판단하고 요청을 거부하고, CSRF토큰이 있으면 사용자의 세션객체 안에 있는 CSRF토큰과 같은지 비교하고, 같으면 요청이 실행된다. Controller 실행 전에 실행된다.

CustomSecurityConfig.java
spring security 연동하기.txt0.01MB
JSP에서 인증된 사용자정보 이용하기
* spring security 태그 라이브러리를 이용하면 인증여부, 인증된 사용자의 정보, 인증된 사용자의 보유 권한을 JSP에서 이용할 수 있다.
* spring security 주요 태그
<sec:authorize />
사용자 인증 여부 정보를 체크한다.
사용자 보유 권한 정보를 체크한다.
<sec:authentication />
인증된 사용자 정보를 제공한다.
1. 로그인여부에 따라서 메뉴를 다르게 표시하기
<sec:authorize access="isAuthenticated( )" >
// isAuthenticated()가 true로 판정되면 인증된 사용자다.
<a href="/logout">로그아웃</a>
</sec:authorize>
<sec:authorize access="!isAuthenticated( )" >
// !isAuthenticated()가 true로 판정되면 인증되지 않은 사용자다.
<a href="/login">로그인</a>
<a href="/register">회원가입</a>
</sec:authorize>
2. 로그인여부에 따라서 버튼을 출력하거나 출력하지 않기
<sec:authorize access="isAuthenticated( )" >
// isAuthenticated()가 true로 판정되면 인증된 사용자다.
<a href="insert">새 글 작성하기</a>
</sec:authorize>
3. 로그인한 사용자의 보유 권한에 따라서 메뉴를 다르게 표시하기
<sec:authorize access="hasRole('ROLE_ADMIN')">
// 관리자 권한을 보유한 사용하는 true 로 판정된다.
<a href="/admin/users">사용자관리</a>
<a href="/admin/posts">게시글관리</a>
<a href="/admin/stats">통계관리</a>
</sec:authorize>
4. 로그인한 사용자의 사용자 아이디와 컨텐츠를 작성한 사용자의 아이디를 비교해서 버튼을 출력하거나 출력하지 않기
// 인증된 사용자정보를 loginUser변수명으로 저장한다.
<sec:authentication property="principal" var="loginUser" />
<c:if test="${post.userId eq loginUser.id }">
<a href="modify?postNo=${post.no }" class="btn btn-warning btn-sm">수정</a>
<a href="delete?postNo=${post.no }" class="btn btn-danger btn-sm">삭제</a>
</c:if>
5. 로그인한 사용자의 이름을 출력하기
<sec:authorize access="isAuthenticated( )" >
<sec:authentication property="principal.name" />님 환영합니다.
<a href="/logout">로그아웃</a>
</sec:authorize>
'기록' 카테고리의 다른 글
학원 day100. 폼 입력값 유효성 검증, CSRF (0) 2023.01.26 학원 day98. Spring Security (0) 2023.01.20 학원 day 97. ajax, each함수 (0) 2023.01.19 학원 day96. Rest API (0) 2023.01.18 학원 day95. @SessionAttributes, 스프링부트 (0) 2023.01.17