-
학원 day43. 선택자, 색표현, 박스모델, 포지션, 레이아웃기록 2022. 11. 4. 09:53
CSS 선택자
- HTML문서에서 스타일을 적용할 대상을 선택할 때 사용한다.
기본 선택자

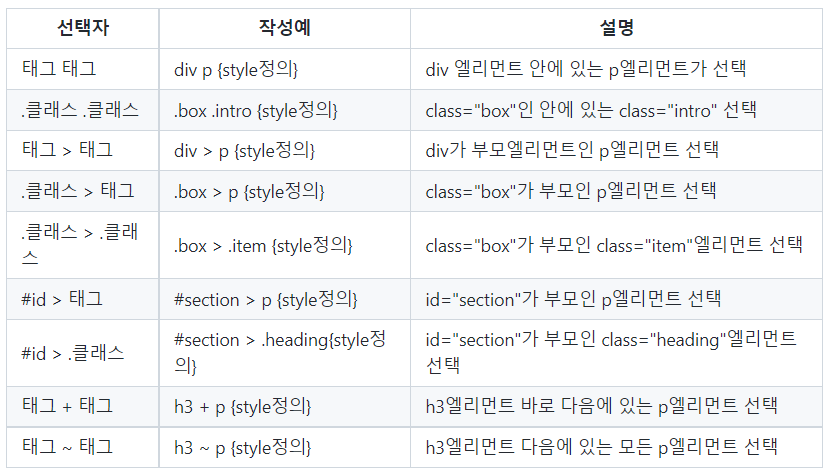
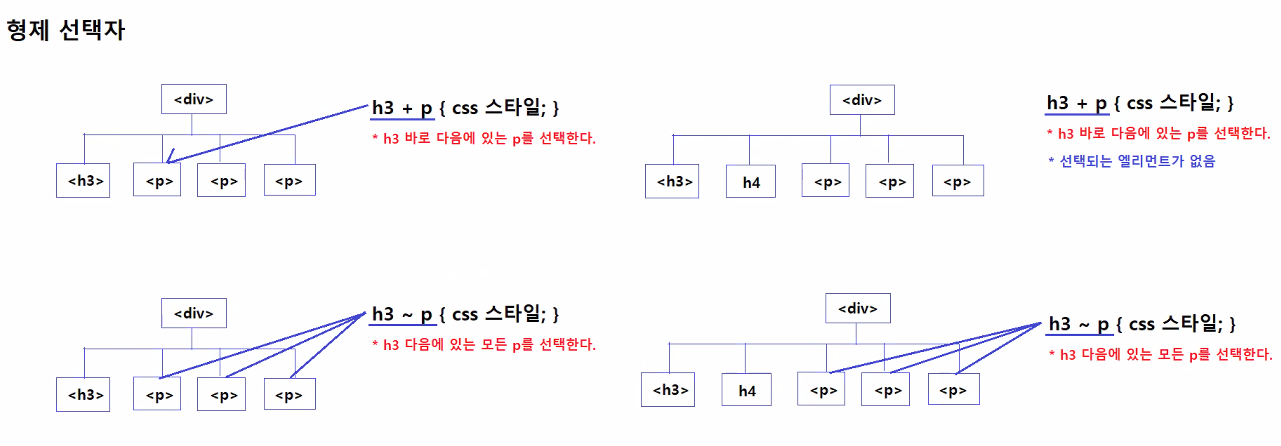
자손, 자식, 형제 선택자

=> 1~2번 자손선택자, 3~7번 자식선택자, 8~9번 형제선택자
(자손선택자와 자식선택자의 차이점 : 자손선택자는 모든 하위요소(자식+자손)를 선택하고, 자식선택자는 직접적인 자식 요소만을 선택한다.)

=> 선택자 사이에 공백이 있으면 자손선택자이다.

속성 선택자


<화면 결과>

필터 선택자

가상 선택자

색 표현
    <title>색 표현</title>
    <style>
        div{
            margin: 5px;
            padding: 10px;
            color: white;
            font-weight: bold;
        }
    </style>
</head>
<body>
    <h1>색</h1>

    <h3>색이름으로 색표현</h3>
    <div style="background-color: black;">black</div>
    <div style="background-color: red;">red</div>
    <div style="background-color: green;">green</div>
    <div style="background-color: blue;">blue</div>

    <h3>RGB 색 표현</h3>
    <div style="background-color: rgb(0, 0, 0);">black</div>
    <div style="background-color: rgb(255, 0, 0);">red</div>
    <div style="background-color: rgb(0, 255, 0);">green</div>
    <div style="background-color: rgb(0, 0, 255);">blue</div>
    <div style="background-color: rgb(255, 255, 0);">yellow</div>
    <div style="background-color: rgb(255, 0, 255);">fuchsia</div>
    <div style="background-color: rgb(0, 255, 255);">aqua</div>
    <div style="background-color: rgb(150, 50, 255);">bts</div>
    <div style="background-color: rgb(10, 10, 10);">무채색</div>
    <div style="background-color: rgb(50, 50, 50);">무채색</div>
    <div style="background-color: rgb(100, 100, 100);">무채색</div>
    <div style="background-color: rgb(150, 150, 150);">무채색</div>
    <div style="background-color: rgb(200, 200, 200);">무채색</div>
    <div style="background-color: rgb(255, 255, 255);">무채색</div>

    <h3>16진수 표기법으로 색표현</h3>
    <div style="background-color: #000000;">black</div>
    <div style="background-color: #ff0000;">red</div>
    <div style="background-color: #00ff00;">green</div>
    <div style="background-color: #0000ff;">blue</div>
    <!--숫자가 두개씩 같을 때에는 하나만 적어도 된다.-->
    <div style="background-color: #000;">black</div>
    <div style="background-color: #f00;">red</div>
    <div style="background-color: #0f0;">green</div>
    <div style="background-color: #00f;">blue</div>
    <div style="background-color: #fff;">무채색</div>
    <div style="background-color: #ddd;">무채색</div>
    <div style="background-color: #999;">무채색</div>
    <div style="background-color: #666;">무채색</div>
    <div style="background-color: #333;">무채색</div>
    <div style="background-color: #000;">무채색</div>

</body>
</html>
-> rgb 3가지 숫자가 똑같을 경우 무채색을 띈다.
-> 256*256*256가지(16,777,216가지)의 색을 만들수 있다.
-> 숫자가 높을수록 빛을 많이 받은 색이다.

박스모델
- 모든 HTML 엘리먼트(태그) 박스처럼 다루어진다.
- 화면 디자인, 화면의 레이아웃을 구성할 때 HTML 엘리먼트(태그)를 박스처럼 다루게 되는데, 이를 박스모델이라고 한다.
- 박스모델의 구성
- HTML의 모든 엘리먼트(태그)는 margin, border, padding, content로 구성된다.
- margin : 테두리(border)의 바깥여백, 다른 엘리먼트와의 경계
- border : 엘리먼트의 테두리, padding과 contents를 감싸고 있다.
- padding : 테두리(border)와 contents 사이의 여백, contents를 감싸고 있다.
- contents : 박스모델이 가지는 실제 내용(텍스트 혹은 이미지)

- margin을 크게 잡으면 인접한 엘리먼트랑 멀어지는 것이다.
- margin은 빈 여백이니까 백그라운드색을 넣을 수 없다. margin은 단순히 경계를 나타내는 빈 여백이다.
- width: 100px; 으로 작성하는 건 content의 너비만 설정하는 것이다.
실제 Element의 너비는 margin-left + border-left + padding-left + content + padding-right + border-right + margin-right

- 박스모델에서 엘리먼트의 실제 너비와 높이
- box-sizing이 content-box인 경우
- css에서 정의한 width가 contents의 너비로 정의 된다.
디폴트너비 = leftmargin + leftborder + leftpadding + content(width) + rightpadding + rightborder + rightmargin- boz-sizing이 border-box인 경우
- css에서 정의한 width가 border와 padding, content의 너비를 합한 것으로 정의된다.
너비 = leftmargin + width + rightmargin - box-sizing이 content-box인 경우
 <!--
        박스모델의 프로퍼티값 설정하기
            - top, right, bottom, left를 각각 지정하기
                {padding-top:10px; padding-right:40px, padding-bottom: 80px; padding-left:120px;}
            - top, right, bottom, left의 값을 전부 같은 값으로 지정하기
                {padding: 40px;}
            - top, bottom이 같은 값, right와 left를 같은 값으로 지정하기
                {padding: 40px 80px;}   /* top과 bottom은 40px, right와 left는 80px */
            - top, right, bottom, left를 각각 다른 값으로 지정하기
                {padding: 10px 20px 40px 80px;} /* top -> right -> bottom -> left 순으로 지정된다 */
    -->
    <div style="padding:20px; margin-top: 5px;">
            We recommend reading this tutorial, in the sequence listed in the menu.
            If you have a large screen, the menu will always be present on the left.
            If you have a small screen, open the menu by clicking the top menu sign
    </div>
    <div style="padding:20px 50px; margin-top: 5px;">
        We recommend reading this tutorial, in the sequence listed in the menu.
        If you have a large screen, the menu will always be present on the left.
        If you have a small screen, open the menu by clicking the top menu sign
    </div>
    <div style="padding:10px 40px 80px 120px; margin-top: 5px;">
        We recommend reading this tutorial, in the sequence listed in the menu.
        If you have a large screen, the menu will always be present on the left.
        If you have a small screen, open the menu by clicking the top menu sign
    </div>
<화면결과>


<style>
#boxmodel-2 {
box-sizing: border-box;
width: 300px;
padding: 25px;
border: 10px solid black;
margin: 20px;
}
</style>
css position
- 포지션 속성은 엘리먼트의 위치를 결정하는 CSS 속성이다.
position속성의 종류
- static
- position 속성을 정의하지 않았을 때 기본값으로 설정되어 있는 값
- 왼쪽에서 오른쪽으로, 위에서 아래로 엘리먼트가 배치되는 것
- relative
- static이었을 때의 위치를 기준으로 top, right, bottom, left 방향으로 지정된 픽셀만큼 엘리먼트의 위치를 이동시킬 수 있다.
- absolute
- 부모엘리먼트의 position 설정이 relative,fixed, absoute로 설정되어 있을 때 (부모엘리먼트가 static 속성이 아닌 경우) 부모를 기준으로 엘리먼트의 위치를 이동시킨다.
- fixed
- 엘리먼트의 위치를 고정시킨다.
- 내비게이션, 좌측 메뉴, 우측의 퀵메뉴, 배너광고 고정시킬 때 사용
    <title>포지션</title>
    <style>
        div.box {
            box-sizing: border-box;
            border: 2px solid black;
            padding: 10px;
            margin: 10px;
            width: 100px;
            height: 100px;
        }
        #box-1 {
            background-color: red;
            z-index: 1;
        }
        #box-2 {
            position: relative;
            left: 50px;
            top: -50px;
            background-color: blue;
            z-index: -1;
        }
        #box-3 {
            position: relative;
            left: 200px;
            background-color: green;
        }
        .container {
            box-sizing: border-box;
            border: 2px solid black;
            padding: 10px;
            margin: 10px;
            width: 300px;
            height: 200px;
        }
        #container-1 {
            position: absolute;
            left: 400px;
            top: 200px;
            background-color: lightblue;
        }
        #container-2 {
            position: relative;
            left: 300px;
            background-color: lightgreen;
        }
        #box-4, #box-5, #box-6 {
            position: absolute;
            left: 75px;
            top: 50px;
        }
        #box-7 {
            position: fixed;
            top: 20px;
            right: 20px;
        }
    </style>
</head>
<body>
    <h1>엘리먼트의 위치를 결정하기</h1>

    <h2>relative로 엘리먼트의 위치 변경하기</h2>
    <p>relative는 그 엘리먼트가 원래 있어야하는 위치를 기준으로 이동시킨다.</p>
    <div id="box-1" class="box">박스1</div>
    <div id="box-2" class="box">박스2</div>
    <div id="box-3" class="box">박스3</div>

    <h3>absolute로 엘리먼트의 위치 변경하기</h3>
    <div id="container-1" class="container">
        <div id="box-4" class="box"></div>
    </div>
    <div id="container-2" class="container">
        <div id="box-5" class="box"></div>
    </div>
    <div id="box-6" class="box"></div>

    <h3>fixed로 엘리먼트의 위치를 고정시키기</h3>
    <div id="box-7" class="box"></div>

</body>
</html>
CSS Layout
- float 속성
- 부모엘리먼트 내의 특정 엘리먼트를 왼쪽 혹은 오른쪽으로 떠 있게 하는 것이다.
- 엘리먼트가 floating되면 다른 엘리먼트는 floating된 엘리먼트 아래로 들어오게 된다.
- floating된 엘리먼트 아래로 들어온 엘리먼트의 켄텐츠는 floating된 엘리먼트를 피해서 화면에 표시된다.
- 부모엘리먼트 내의 특정 엘리먼트를 왼쪽 혹은 오른쪽으로 떠 있게 하는 것이다.
- overflow 속성
- floating된 엘리먼트의 높이가, 원래 그 엘리먼트 포함하고 있던 부모 엘리먼트의 높이보다 크면, 부모엘리먼트 밖으로 벗어나게 된다.
- 부모 엘리먼트에 overflow:auto속성을 추가하면, 부모엘리먼트 밖으로 벗어나는 문제를 해결할 수 있다.
- clear 속성
- 특정 엘리먼트의 옆쪽에 floating된 엘리먼트가 위치하지 못하게 하는 것이다.
<!DOCTYPE html>
<html lang="ko">
<head>
    <meta charset="UTF-8">
    <meta http-equiv="X-UA-Compatible" content="IE=edge">
    <meta name="viewport" content="width=device-width, initial-scale=1.0">
    <title>Document</title>
    <style>
        div {
            box-sizing: border-box;
            border: 2px solid black;
            padding: 10px;
            margin: 10px;
        }
        #wrapper {
            width: 1000px;
            margin: 10px auto;
            overflow: hidden;
        }
        .section {
            float: left;
            width: 305px;
        }
    </style>
</head>
<body>
    <div id="wrapper">
        <div class="section">
            CSS stands for Cascading Style Sheets
            CSS describes how HTML elements are to be displayed on screen, paper, or in other media
            CSS saves a lot of work. It can control the layout of multiple web pages all at once
            External stylesheets are stored in CSS files
        </div>
        <div class="section">
            CSS stands for Cascading Style Sheets
            CSS describes how HTML elements are to be displayed on screen, paper, or in other media
            CSS saves a lot of work. It can control the layout of multiple web pages all at once
            External stylesheets are stored in CSS files
        </div>
        <div class="section">
            CSS stands for Cascading Style Sheets
            CSS describes how HTML elements are to be displayed on screen, paper, or in other media
            CSS saves a lot of work. It can control the layout of multiple web pages all at once
            External stylesheets are stored in CSS files
        </div>
    </div>
</body>
</html>
<화면결과>

'기록' 카테고리의 다른 글
학원 day44(2). Tomcat, JSP (0) 2022.11.07 학원 day44. 네트워크 (0) 2022.11.07 학원 day42. 폼(2), id와 class, CSS (0) 2022.11.03 학원 day41. 태그(2), 엘리먼트, 폼 (0) 2022.11.02 학원 day40. 웹, HTML, 태그, 속성 (0) 2022.11.01