-
학원 day78. JSTL(2)기록 2022. 12. 23. 18:03
- <c:forEach> 태그
- for문과 같은 역할을 수행한다.
- 배열 혹은 콜렉션(List, Set)에 대해서 그 항목의 갯수만큼 반복작업을 수행한다.
- 사용법
<c:forEach var="변수명" items="${표현식}"> <p>${변수명}<p> </c:forEach>- items의 표현식으로 찾은 값이 반드시 배열 혹은 콜렉션이어야 한다.
- 검색된 배열 혹은 콜렉션의 요소 갯수만큼 컨텐츠를 반복 출력한다.
- var는 배열 혹은 콜렉션에서 반복수행시 해당 요소가 저장되는 변수의 이름을 지정한다.
<c:forEach var="변수명1" items="${표현식}" varStatus="변수명2"> <p>${변수명2.count} ${변수명1}<p> </c:forEach>- varStatus에 지정된 변수에는 현재 반복상태정보를 담고 있는 객체가 전달된다.
- 반복상태 정보
- index : 현재 추출한 요소의 인덱스번호(0부터 시작)
- count : 현재 반복횟수(1부터 시작)
- first : 첫번째 요소인 경우 true
- last : 마지막번째 요소인 경우 false
<c:forEach var="변수명" begin="${표현식}" end="${표현식}"> <a href="list.hta?pageno=${변수명}">${변수명}</a> </c:forEach>- begin은 시작값, end는 끝값을 지정한다.
- begin과 end는 정수값이어야 한다.
- begin, end의 구간만큼 컨텐츠를 반복출력한다.
- var는 현재 숫자값을 저장하는 변수의 이름을 지정한다.

hashMap안에 as empId의 empId를 key값으로 저장된다.
CoreController.java
public class CoreController implements Controller {

	@Override
	public String execute(HttpServletRequest request, HttpServletResponse response) throws Exception {

		request.setAttribute("content1", "안녕하세요");
		request.setAttribute("content2", "<button>버튼</button>");

		request.setAttribute("score", 70);

		HttpSession session = request.getSession();
		session.setAttribute("LOGIN_USER_ID", "hong");

		Product product = new Product(100, "맥북 프로", "애플", 2500000, 2450000, 3);
		request.setAttribute("goods", product);

		String[] names = {"홍길동", "김유신", "강감찬", "이순신"};
		List<String> menus = new ArrayList<>();
		menus.add("아메리카노");
		menus.add("바닐라 라떼");
		menus.add("카페 모카");
		menus.add("에스프레소");
		menus.add("카라멜 마끼아또");

		request.setAttribute("names", names);
		request.setAttribute("menus", menus);

		List<Category> categories = new ArrayList<>();
		categories.add(new Category(100, "국내도서"));
		categories.add(new Category(200, "외국도서"));
		categories.add(new Category(300, "전자책"));
		categories.add(new Category(400, "음반/CD"));

		request.setAttribute("categories", categories);  // 보통 이름을 같게 한다.

		List<Product> products = new ArrayList<>();
		products.add(new Product(100, "맥북 프로", "애플", 250, 245, 10));
		products.add(new Product(101, "맥북 에어", "애플", 250, 245, 10));
		products.add(new Product(102, "레노버 싱크패드", "레노버", 280, 255, 10));
		products.add(new Product(103, "아수스 게이밍 노트북", "아수스", 450, 445, 10));
		products.add(new Product(104, "LG 그램 울트라", "LG", 350, 245, 10));
		products.add(new Product(105, "맥프로", "애플", 650, 600, 10));


		request.setAttribute("products", products);

		List<Map<String, Object>> list = List.of(
				Map.of("no", 100, "title", "이것이 자바다", "price", 35000),
				Map.of("no", 200, "title", "자바의 정석", "price", 30000),
				Map.of("no", 300, "title", "혼자서 공부하는 자바", "price", 37000)
		);

		request.setAttribute("books", list);

		return "core.jsp";
	}
}
List.of 리스트에 항목을 추가할 때,
Map.of는 맵에 key, value를 담을 때 사용한다.
core.jsp
<%@ page language="java" contentType="text/html; charset=UTF-8"
 	pageEncoding="UTF-8"%>
<%@ taglib prefix="c" uri="http://java.sun.com/jsp/jstl/core" %>
<!DOCTYPE html>
<html lang="ko">
<head>
<meta charset="UTF-8">
<meta name="viewport" content="width=device-width, initial-scale=1">
<link href="https://cdn.jsdelivr.net/npm/bootstrap@5.2.2/dist/css/bootstrap.min.css" rel="stylesheet" >
<title>웹 애플리케이션</title>
</head>
<body>
<!--
	core.jsp의 PageContext객체에 속성을 추가한다.
		속성명 : "menu"
		속성값 : "core"
 -->
<c:set var="menu" value="core" />
<div class="container">
	<div class="row">
		<div class="col-12">
			<%@ include file="common/header.jsp" %>
		</div>
	</div>
	<div class="row mb-3">
		<div class="col-12">
			<h3>out 태그</h3>
			<p>EL 표현식으로 값 표현 : ${content1 }</p>
			<p>EL 표현식으로 값 표현 : ${content2 }</p>
			<p>out 태그로 값 표현 : <c:out value="${content1 }" /> </p>
			<p>out 태그로 값 표현 : <c:out value="${content2 }" escapeXml="false" /> </p>
			<p>out 태그로 값 표현 : <c:out value="${content2 }" /> </p>
		</div>
	</div>

	<div class="row mb-3">
		<div class="col-12">
			<h3>if 태그</h3>

			<p>점수에 따라서 합격여부 출력하기</p>
			<c:if test="${score >= 60 }">
				<p>합격입니다.</p>
				<c:if test="${score >= 97 }">
					<p>장학금 지급대상입니다.</p>
				</c:if>
			</c:if>

	<%-- empty는 많이 쓰인다. test라는 속성을 사용해서 쓰인다. --%>
			<p>속성명으로 조회한 값의 존재 여부로 컨텐츠 출력하기</p>
			<c:if test="${empty LOGIN_USER_ID }">
				<a href="loginform.hta">로그인</a>
			</c:if>
			<c:if test="${not empty LOGIN_USER_ID }">
				<a href="logout.hta">로그아웃</a>
			</c:if>

			<p>속성명으로 조회된 객체가 가지고 있는 값에 따라서 컨텐츠 출력하기</p>
			<table class="table">
				<thead>
					<tr>
						<th>상품명</th>
						<th>할인가격 (가격)</th>
						<th>재고량</th>
						<th>비고</th>
					</tr>
				</thead>
				<tbody>
					<tr>
						<td>${goods.name }</td>
						<td><strong class="text-danger">${goods.discountPrice }원</strong><small>(${goods.price }원)</small></td>
						<td>${goods.stock }개</td>
						<td>
							<c:if test="${goods.stock == 0 }">
								<a href="addAlarm.hta?no=${goods.no }" class="btn btn-secondary btn-sm">입고시 알림받기</a>
							</c:if>
							<c:if test="${goods.stock > 0 && goods.stock < 5 }">
								<a href="order.hta?no=${goods.no }" class="btn btn-danger btn-sm">매진임박 지금주문하세요!!!</a>
							</c:if>
							<c:if test="${goods.stock >= 5 }">
								<a href="order.hta?no=${goods.no }" class="btn btn-primary btn-sm">주문하기</a>
							</c:if>
						</td>
					</tr>
				</tbody>
				<tbody>
					<tr>
						<td>${goods.name }</td>
						<td><strong class="text-danger">${goods.discountPrice }원</strong><small>(${goods.price }원)</small></td>
						<td>${goods.stock }개</td>
						<td>
							<c:choose>
							<c:when test="${goods.stock == 0 }">
								<a href="addAlarm.hta?no=${goods.no }" class="btn btn-secondary btn-sm">입고시 알림받기</a>
							</c:when>
							<c:when test="${goods.stock < 5 }">
								<a href="order.hta?no=${goods.no }" class="btn btn-danger btn-sm">매진임박 지금주문하세요!!!</a>
							</c:when>
							<c:otherwise>
								<a href="order.hta?no=${goods.no }" class="btn btn-primary btn-sm">주문하기</a>
							</c:otherwise>
							</c:choose>
						</td>
					</tr>
				</tbody>
			</table>
		</div>
	</div>

	<div class="row mb-3">
		<div class="col-12">
			<h3>choose ~ when ~ otherwise 태그</h3>

			<p>성적에 따라서 등급 출력하기</p>
			<c:choose>
				<c:when test="${score >= 90 }">
					<p>A 학점</p>
				</c:when>
				<c:when test="${score >= 80 }">
					<p>B 학점</p>
				</c:when>
				<c:when test="${score >= 70 }">
					<p>C 학점</p>
				</c:when>
				<c:when test="${score >= 60 }">
					<p>D 학점</p>
				</c:when>
				<c:otherwise>
					<p>F 학점</p>
				</c:otherwise>
			</c:choose>
		</div>
	</div>

	<div class="row mb-3">
		<div class="col-12">
			<h3>forEach 태그</h3>

			<p>기본자료형/문자열이 여러 개 저장된 배열 혹은 콜렉션 출력하기</p>
			<c:forEach var="name" items="${names }">
				<span class="badge bg-secondary">${name }</span>
			</c:forEach>

			<p>기본자료형/문자열이 여러 개 저장된 List 출력하기</p>
			<c:forEach var="menu" items="${menus }">
				<span class="badge bg-secondary">${menu }</span>
			</c:forEach>

			<p>VO 객체가 여러 개 저장된 List 출력하기</p>
			<select name="catNo">
			<c:forEach var="cat" items="${categories }">
				<option value="${cat.no }" > ${cat.name }</option>
			</c:forEach>
			</select>

			<table class="table">
				<thead>
					<tr>
						<th>번호</th>
						<th>상품명</th>
						<th>제조사</th>
						<th>할인가격 (가격)</th>
						<th></th>
					</tr>
				</thead>
				<tbody>
				<c:forEach var="product" items="${products }">
					<tr>
						<td>${product.no }</td>
						<td>${product.name }</td>
						<td>${product.maker }</td>
						<td><strong class="text-danger">${product.discountPrice } 만원</strong><small>(${product.price }) 만원</small></td>
						<td>
							<a href="detail.hta?no=${product.no }">상세보기</a>
							<a href="order.hta?no=${product.no }">바로구매</a>
						</td>
					</tr>
				</c:forEach>
				</tbody>
			</table>

			<p>Map객체를 여러 개 저장하고 있는 리스트 출력하기</p>
			<table class="table">
				<thead>
					<tr>
						<th>번호</th>
						<th>제목</th>
						<th>가격</th>
					</tr>
				</thead>
				<tbody>
				<c:choose>
				 	<c:when test="${empty books }">
				 		<tr>
				 			<td colspan="3" class="text-center">검색된 책이 없습니다.</td>
				 		</tr>
				 	</c:when>
				 	<c:otherwise>
				 		<c:forEach var="book" items="${books }">
				 			<tr>
				 				<td>${book.no }</td>
				 				<td><a href="detail.hta?bookNo=${book.no }">${book.title }</a></td>
				 				<td>${book.price }</td>
				 			</tr>
				 		</c:forEach>
				 	</c:otherwise>
				</c:choose>
				</tbody>
			</table>

			<p>forEach의 varStatus 활용하기</p>
			<table class="table">
				<thead>
					<tr>
						<th>index</th>
						<th>count</th>
						<th>first</th>
						<th>last</th>
						<th>번호</th>
						<th>상품명</th>
						<th>가격</th>
					</tr>
				</thead>
				<tbody>
					<c:forEach var="product" items="${products }" varStatus="x">
						<tr class="${x.first ? 'table-success' : '' }">
							<td>${x.index }</td>
							<td>${x.count }</td>
							<td>${x.first }</td>
							<td>${x.last }</td>
							<td>${product.no }</td>
							<td>${product.name }</td>
							<td>${product.price }</td>
						</tr>
					</c:forEach>
				</tbody>
			</table>

			<p>페이지네이션 출력하기</p>
			<c:forEach var="number" begin="1" end="5">
				<a href="list.hta?page=${number }">${number }</a>
			</c:forEach>
		</div>
	</div>

	<div class="mb-3">
		<div class="col-12">
			<p>url 태그로 링크 생성하기</p>
			<c:url value="list.jsp" var="link">
				<c:param name="page" value="2" />
				<c:param name="row" value="10" />
				<c:param name="sort" value="date" />
				<c:param name="direction" value="desc" />
			</c:url>
			<a href="${link }">링크</a>
		</div>
	</div>
</div>
<script src="https://cdn.jsdelivr.net/npm/bootstrap@5.2.2/dist/js/bootstrap.bundle.min.js"></script>
<script src="https://ajax.googleapis.com/ajax/libs/jquery/3.6.1/jquery.min.js"></script>
</body>
</html>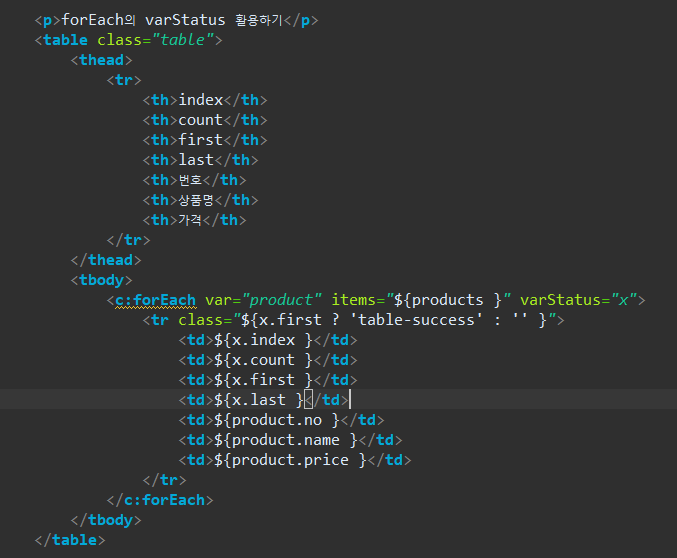

varStatus : 반복의 상태를 나타내는 것 (이름은 아무거나 줘도 상관없다.)
index : 데이터가 저장된 위치, 0번째부터 시작
count : 몇번 째 반복하는지 반복횟수
first : 첫번째 반복일 때 true
last : 마지막 반복일 때 true
- <c:set> 태그
- EL로 표현할 수 있는 값을 가진 변수를 선언한다.
- 사용법
<c:set var="변수명" value="${표현식}" /> <c:set var="변수명" value="값" /> <c:set var="변수명" value="<%=값 %>" />- 속성에 var 지정된 이름으로 값이 저장된다.
- ${변수명}으로 저장된 값을 표현할 수 있다.
- scope는 값이 저장될 객체를 지정한다.
- scope를 적지 않으면 기본적으로 PageContext에 저장된다.
  <c:set var="a" value="길동" />
  <%-- pageContext.setAttribute("a", "길동"); --%>
  <p>${a}</p>

  <c:set var="b" value="길동" scope="page"/>
  <%-- pageContext.setAttribute("b", "길동"); --%>
  <p>${b}</p>

  <c:set var="c" value="유신" scope="request"/>
  <%-- request.setAttribute("c", "유신"); --%>
  <p>${c}</p>

  <c:set var="d" value="감찬" scope="session"/>
  <%-- session.setAttribute("d", "감찬"); --%>
  <p>${d}</p>

  <c:set var="e" value="순신" scope="application"/>
  <%-- application.setAttribute("e", "순신"); --%>
  <p>${e}</p>
include 방식 3가지

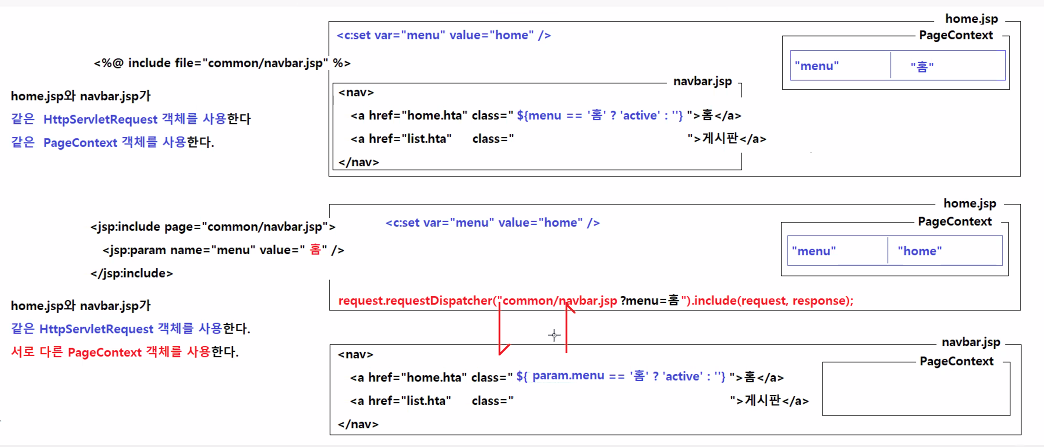
include 방식에 따라 같은 Context객체를 사용하기도 하고 다른 Context객체를 사용하기도 한다.
국제화 태그
- fmt:formatNumber 태그
- 숫자를 지정된 형식에 맞게 출력한다.
- 사용법
<fmt:formatNumber value="${표현식}" />- 숫자에 콤마가 포함되어서 출력된다.
<fmt:formatNumber value="${표현식}" pattern="패턴문자열" />- 숫자가 지정된 패턴형식에 맞게 출력된다.
- value에서 지정된 표현식으로 검색되는 값은 반드시 숫자값이어야 한다.
- fmt:formatDate 태그
- 날짜를 지정된 형식에 맞게 출력한다.
- 사용법
<fmt:formatDate value="${표현식}" />- 날짜가 년월일시분초 형태로 출력된다.
<fmt:formatDate value="${표현식}" pattern="패턴문자열" />- 날짜가 지정된 패턴형식에 맞게 출력된다.
- value에서 지정된 표현식으로 검색되는 값은 반드시 Date 타입이어야 한다.
- fmt:bundle, fmt:message 태그
- 국제화처리를 지원하는 태그다.
- 사용법
<fmt:bundle basename="패키지경로.기본메세지번들파일명"></fmt:bundle>- JSP에서 사용할 메세지 번들 파일을 지정한다.
- 국제화처리를 지원받기 위해서는 HTML 컨텐츠가 fmt:bundle와 </fmt:bundle> 안에 위치해야 한다.
- <fmt:message var="별칭" key="번들파일에 정의한 키" />
- 번들파일에서 키에 해당하는 텍스트를 읽어서 출력한다.
- 사용예
<h1><fmt:message key="label.home.title"/></h1> <fmt:message var="submit_message" key="label.home.btn.submit"/> <input type="submit" value="${submit_message}" /> - 국제화처리 절차
- 지원할 각 언어별로 메세지 번들 파일을 만든다.
- /src/resources/messages.properties 기본 메세지번들 파일
- /src/resources/messages_ko.properties 한국어용 메세지번들 파일
- /src/resources/messages_en.properties 영어용 메세지번들 파일
- /src/resources/messages_ja.properties 일본어용 메세지번들 파일
- 언어별 코드
- 한국어 ko, 영어 en, 중국어 zh, 일본어 ja, 프랑스어 fr, 독일어 de, 스페인어 es
- 국가별 코드
- 한국 kr, 미국 us, 영국 gb, 중국 cn, 일본 jp, 프랑스 fr, 독일 de, 스페인 es
- 언어별 코드
- JSP 파일에서 메세지번들 파일의 기본 경로 및 이름을 설정한다.
<fmt:bundle basename="패키지경로.기본메세지번들파일명" />- 메세지를 표현할 곳에 메세지번들파일에서 정의한 키를 지정한다.
<fmt:message key="번들파일에 정의한 키" /> - 지원할 각 언어별로 메세지 번들 파일을 만든다.
---------------------------------------------------------------------------------------------------------------------------------------------
** 주의할 점 **
표현식하고 쌍따옴표 사이에 공백이 있으면 안된다. 문자로 파악하기 때문에
"${categories }"> (o)
"${categories }" > (x)
'기록' 카테고리의 다른 글
학원 day80. model2 실습 (0) 2022.12.27 학원 day79. Redirect, 세션 (0) 2022.12.26 학원 day77. JSP의 속성과 스코프, EL, JSTL (0) 2022.12.22 학원 day76. MVC 패턴 (0) 2022.12.21 학원. 세미프로젝트 (0) 2022.12.21 - <c:forEach> 태그
